Connect-to-WiFi on your Windows Mobile computer using the following instructions. Depending on which version of Windows you are running, the options available may vary slightly but the general process is the same.
- Tap on Wireless Manager, which is the Icon at the bottom right of the image below with the Red X over it.

*If the Icon is not present, you can manually open it from File Explorer by selecting Start >> Programs >> Fusion >> WCLAUNCH - Upon tapping the Wireless Manager icon, the main menu should pop up:

- If necessary, tap on “Enable Radio” and wait for the WiFi-to-activate.
- Select “”Find WLANs”
- After a few seconds all the available wireless LANs will be displayed:
- Now tap and hold the stylus on the wireless LAN you want-to-connect to.
- Tap “Connect”
- The ESSID profile entry screen appears:
- Usually you don’t have-to-modify these settings so just tap on Next.
- Change the “Allow Any Country”-to-your country.
- Tap Next once you select your country.
- You will get this warning message:
- Just tap OK.
- Tap Next.
- Now, unless you have “Authentication” tap on Next:
- On this screen select the encryption type for your wireless network.
- We would suggest that you do not leave your network “Open”.
- If you have an older style access point the encryption might be 40 bit or 128 but WEP. If so, select the appropriate option.
- In this example we are using TKIP (WPA-Personal). If you have AES (WPA2-Personal) select this option.
- In our example we are selecting TKIP:
- Tap Next.
- Now key in the TKIP passphrase – this is case sensitive so make sure you key it in correctly. Our tip is-to-make a barcode and scan it in.
- When you have double checked the passphrase then click on Next.
- If you have a DHCP server, simply tap on Next.
- If you want-to-enter in a static IP address, tap the drop down combo box and select “Static”. A new screen will appear and you have-to-enter in the IP address, the Gateway and DNS server IP addresses. Then tap on Next.
- Typically leave this setting at “Automatic”. Tap Next.
- Typically “Fast Power Save” is the default. Tap Finish.
- After a few seconds your new profile should be seen in the “Manage Profiles” window and the radio icon should appear-to-the left of the ESSID name.
- Tap OK on the top right of the screen.
- The wireless icon should now look like this:
- While the icon may appear that you are connected, you have-to-check the “Wireless Status” and make sure that you have an IP address.
- Tap on the icon and select “Wireless Status” from the pop up menu.
- Then select “3) IPv4 Status”
- Make sure that you have an IP address:
- To go back-to-the desktop tap “OK” and then tap “OK” again.
- If you have 0.0.0.0 as an IP address try inputting the passphrase again. If that does not work make sure that the DHCP pool is big enough. Finally warm boot the mobile computer and see if connects after a warm boot.
- If you have a valid IP address make sure that the mobile computer can connect-to-the internet.-to-test this, open Internet Explorer from the Start menu.
- Once Internet Explorer is open type in www.google.com into the address bar.
- If you get this screen instead of google.com
- Tap on “Settings”
- If you are at the desktop, you can get-to-this screen by tapping on “Start” -> “Settings” -> “Connections” tab, then “Connections” icon.
- Tap on the “Advanced” tab.
- Now click on “Select Networks”
- Change “My ISP”-to-“My Network Connection”
- Once “My Work Network” is selected tap on OK.
- Tap OK
- Now try and get Google-to-appear
- Tap on the refresh icon (the curved arrow) next-to-the internet address. If your settings are correct a web page will open.
- You are now connected-to-your wireless LAN and have an internet connection.


Location of SD card slot depends on the model of your mobile computer.
Motorola MC9060/MC9090/MC9190/MC92N0: SD card slot is accessed by removing the keypad. Remove the two small Phillips screws at the top corners of the keypad and pull down forcefully to remove the keypad.
Motorola MC70/MC75/MC75A: SD card slot is located behind a small panel on the side of the unit. The small panel must be removed by unscrewing two small Phillips screws.
Motorola MC3090/MC3190/MC32N0: SD card slot is located within the battery compartment underneath the primary battery.
Motorola MC55/MC55A/MC65/MC67: SD card slot is located within the battery compartment underneath the primary battery.
Intermec CN3/CN50: SD card slot is located within the battery compartment underneath the primary battery.
Mobile computers do not have barcode scanning functionality enabled by default because most customers use their own software to enable scanning. Customers who are not using this type of application must install DataWedge to enable scanning. Here is the link to download DataWedge for Motorola/Windows Mobile Devices:
https://www.zebra.com/us/en/support-downloads/software/utilities/datawedge-toolkit.html
Once DataWedge is installed, you can configure barcode scanning settings by tapping on the DataWedge icon, which may be located on the Home Screen or the lower right corner of the Home Screen depending on your Operating System. Here is an example of the DataWedge icon.

- Make sure unit is charged overnight before first use. Main removable batteries normally require 8 hours to charge and then the internal backup battery must charge for some more hours.
- Check for debris or damage on the battery terminals of the mobile computer. Often times cleaning debris can resolve charging issues. Damaged terminals must be serviced.
- Please refer to the section above “How to enable barcode scanning”
- If issues persist please try a Clean Boot
- If issues continue service may be required
- Please refer to the section above “How to connect to Wireless Network”
- If issues persist please try a Clean Boot
- If issues continue please contact us to see if there is a WiFi firmware update for your product
Many other general issues can be resolved by a Clean Boot. If a Clean Boot does not resolve your issue, or if you need further assistance, please contact us for service.
A clean boot resolves many issues by completely wiping all the data from the unit and resetting it back to original factory default state. Please be sure to back up and save any pertinent data and settings prior to performing this process.
For Motorola Devices:
- Download the appropriate “Clean Boot Package” for your device by visiting the following link: https://www.zebra.com/us/en/support-downloads/mobile-computers.html
- Click on the link for the model of your device
- On the page for your model, scroll down to “Utilities” and select “Clean Boot Package for Windows Mobile” for your device
- On the next page download “Clean Boot and Clean Application Package” for your device – the download will be a .Zip archive
- Unzip, copy, and paste the contents of the .Zip archive to the root directory of an SD card (2GB or smaller for WM50) and install the SD card into your device Alternatively, the files may be saved to the TEMP folder of t your device
- Navigate to the location of the files on your device and execute “StartUpdLdr”
- The device will automatically restart and perform the factory reset, which will take approx 5-10 minutes to complete
- Make sure the device is connected to a power source during the process
For Intermec Devices:
CN50:
- Remove the battery pack from the back of the CN50
- Reinsert the battery pack and press the Power button
- When the CN50 starts the boot process, simultaneously press < and > until the IPL Boot Configuration Menu appears on the screen.
- Press 2 to select Force Clean Boot and then press 0 to select Continue with Boot
- The CN50 executes the clean boot. This process takes a few minutes
- When prompted, tap the screen to set up the CN50 • Follow the instructions to calibrate the screen

CN3
- Press the Power button to suspend the CN3
- Remove the battery pack from the CN3
- With a stylus, press the Reset button on the battery cavity
- Press and hold the Power button as you insert the battery back into the CN3
- Continue to hold the Power button until a Warning message appears on the display
- Release the Power button, read the message, and press either button on the right side to continue
- Wait for the CN3 to factory reset
Mobile computers can generally be upgraded one level beyond their default OS. For example, WM 5.0 devices can be upgraded to WM6.1 but no further. OS cannot be changed between CE and WM. In most cases OS can be downgraded back to the default OS as well. Any upgrade of OS will require purchase of Windows License. Please complete a repair request if you would like more information about upgrading our downgrading your equipment:
Many Motorola devices are prelicensed for Wavelink TE. To download Wavelink for your device, please visit the following link and select the brand and model of your device to access the available downloads: http://www.wavelink.com/download/main.aspx
Downloads for many different brands and models are available at the link above.
POS Scanner (Wired or Wireless)
- Unplug the scanner, reboot your PC and let Windows completely startup, then plug it in again.
- If the scanner still does not work, factory reset it by printing and scanning the following barcode

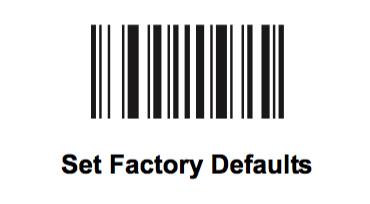
Print out and scan the following barcodes in order. You scanner will beep 4 times confirming the programming.

- For wired scanners, please try on another PC. If the problem persists most likely the USB cable is defective. Otherwise, the scanner will need to be replaced.
- For wireless scanners also check the battery is properly charged and is not defective.
Mobile Printer
You may reset PIN and perform other administrative functions for MF4t/MF4te by using the MFlash Mobile Printer Utility software, which is available as a free download for your PC from the Datamax-Oneil Website. Here is the link: https://www.datamax-oneil.com/do/de/en-us/home/printers-software/software/utility
- If you are pairing an MZ320 with an Android device you need to first connect it to a PC via USB cable and create a PIN.
- Then you enter the newly created PIN on your Android device to connect to the printer.
- Here is the link to download the printer setup utility for your PC:
https://www.zebra.com/us/en/products/software/barcode-printers/zebralink/zebra-setup-utility.html Please note Apple devic
In some situations your Zebra RW420 printer may require Firmware Update, or you may need to install the appropriate driver to connect with your computer. Necessary files can be found here: https://www.zebra.com/us/en/support-downloads/printers/mobile/rw-420.html
In some situations your Zebra printer may require Firmware Update, or you may need to install the appropriate driver to connect with your computer. Necessary files can be found here:
https://www.zebra.com/us/en/support-downloads/printers.html
You may reset PIN and perform other administrative functions for MF4t/MF4te by using the MFlash Mobile Printer Utility software, which is available as a free download for your PC from the Datamax-Oneil Website. Here is the link: https://www.datamax-oneil.com/do/de/en-us/home/printers-software/software/utility
For Windows updates or other software and updates for your Zebra printer, necessary files can be found here: https://www.zebra.com/us/en/support-downloads/printers.html


